Camera Sensor is a dockable panel that behaves like the Attribute Editor: pick a camera body (sensor / film-back size) and a lens (focal length) from presets and the perspective / camera viewport gate updates live — no bake, no apply button. An animated top-view FOV wedge in the header opens and closes as you change focal length, and you can save full setups into A/B slots to compare framing on a shot.
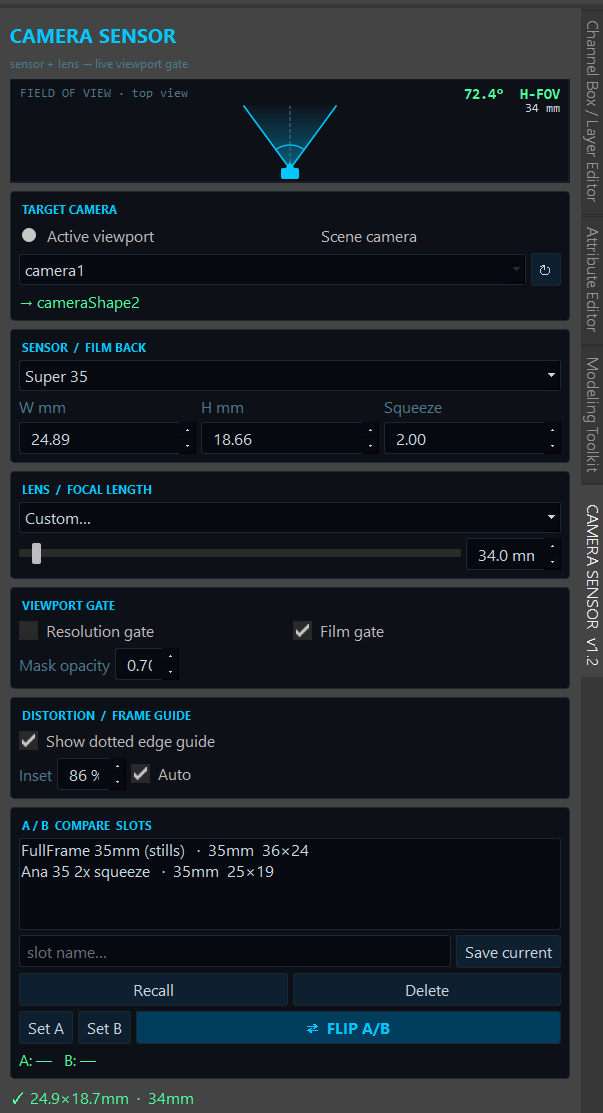
- 1Animated FOV Header
A top-view diagram of the lens — a little camera body at the apex with a wedge fanning out in front of it. The wedge opens on wide / short lenses and closes on telephoto, easing toward the new angle so the change reads as an animation. The readout shows the live horizontal field of view in degrees (
52.0°here) and the focal length in mm, and it accounts for anamorphic squeeze. See section 02 for the maths. - 2Target — Active Viewport
Drives whatever camera the focused viewport is looking through. It reads the active model editor even when the tool itself has focus, so you can “look through a cam and tweak” exactly like the Attribute Editor.
- 3Target — Scene Camera
Switches targeting to an explicit camera chosen from the dropdown below — best when A/B comparing or when the camera you want isn't the one you're looking through.
- 4Camera Dropdown
Lists every non-default camera in the scene (Maya's
persp/top/front/sideare filtered out). Selecting one seeds the whole UI from that camera's current sensor, squeeze and focal length. - 5Refresh
Re-scans the scene for cameras — handy after importing, creating or renaming one.
- 6Target Readout
Confirms the exact
cameraShapebeing driven (e.g.→ cameraShape2), so you always know where your changes are landing. - 7Sensor Preset Dropdown
Grouped list of real bodies — Digital Cinema, Film Stock, Stills / Consumer — plus a
Custom…entry. Choosing a preset fills the three fields below and writes the film back immediately. Anamorphic presets also set the squeeze. - 8Width (mm)
Horizontal film-back size in millimetres. Written to
horizontalFilmApertureas inches (mm ÷ 25.4). Editable directly for a custom sensor. - 9Height (mm)
Vertical film-back size in millimetres →
verticalFilmAperture. Together with width it sets the gate's aspect ratio. - 10Squeeze
Anamorphic squeeze ratio →
lensSqueezeRatio.1.0is spherical;2.00(shown) is classic 2× anamorphic. This widens both the FOV wedge and the distortion guide horizontally. - 11Lens Preset Dropdown
Common primes from 8 mm to 600 mm. Pick one to snap the focal length; the field reads
Custom…when the value doesn't match a prime. - 12Focal Slider
Drag for any focal length in between the primes. The FOV wedge in the header opens / closes live as you scrub.
- 13Focal Spin-box
Type an exact focal length in mm →
focalLength. Slider, spin-box and dropdown stay in sync. - 14Resolution Gate
Toggles the resolution gate (
displayResolution) so the render framing is drawn in the viewport. - 15Film Gate
Toggles the film gate (
displayFilmGate) — the physical sensor outline. Either gate turns on the gate mask automatically. - 16Mask Opacity
How dark the area outside the gate is drawn (
displayGateMaskOpacity) —0= invisible,1= solid black surround. - 17Show Dotted Edge Guide
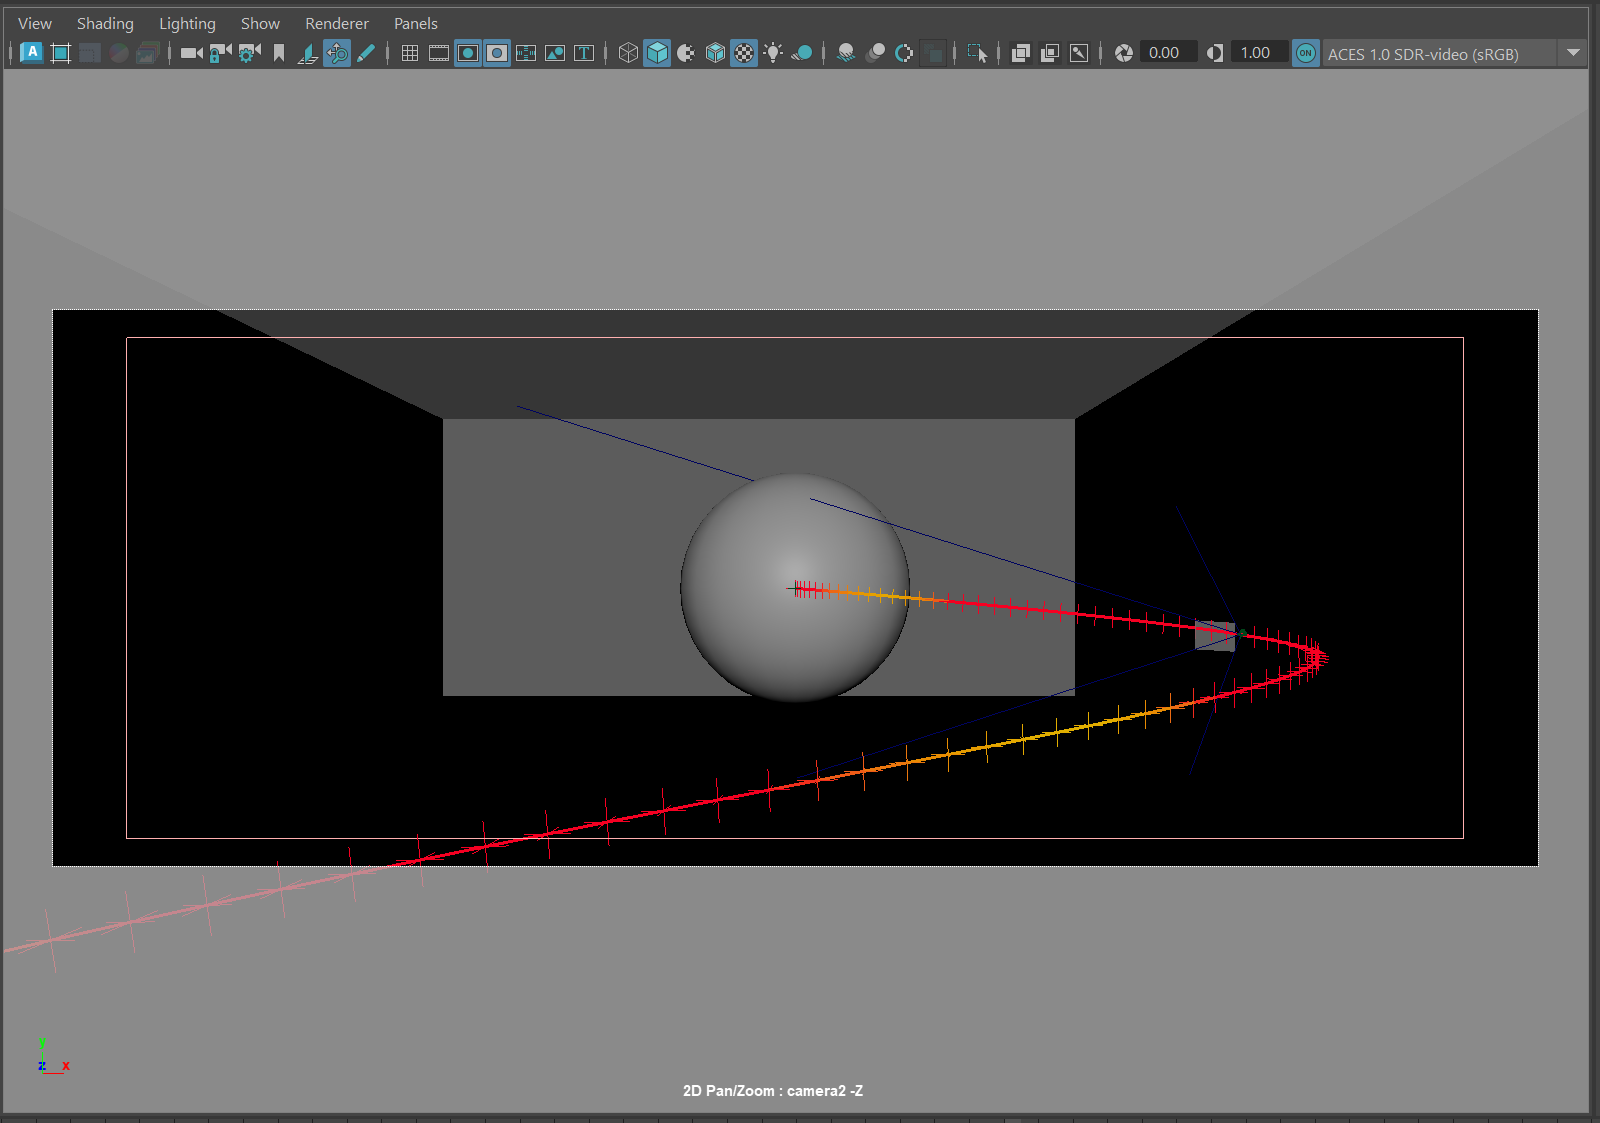
Builds / removes the dashed distortion guide parented to the camera. Anything outside the ring is in the heavy lens-distortion zone. See section 04 for a viewport example.
- 18Inset %
How far in from the frame edge the dotted ring sits —
86%shown here (set by Auto, see #29). The guide rebuilds live to track the current frustum. Editable directly when Auto is off; greyed out when Auto is on so you can still see what was applied. - 29Auto inset NEW · v1.3
Tick to have the tool pick the inset for you based on focal length — wider lenses pull in because barrel distortion grows toward the frame edge; telephotos ease off because there's very little distortion to mind. The computed value is mirrored into field #18 so you can always see what was applied. Curve (mm → %):
8→72·14→76·24→82·35→86·50→90·85→93·135→95·300→96, log-interpolated in between. - 19Slot List
Saved setups, each showing its name, focal length and sensor size. Double-click a row to recall it. This is the heart of A/B comparison.
- 20Slot Name Field
Name the setup before saving (e.g. FullFrame 35mm). Leave it blank and the tool auto-names it from the focal length and sensor size.
- 21Save Current
Snapshots the entire current setup — sensor, squeeze, focal length and gate settings — into a new slot. Slots persist per-user via
optionVar(JSON). - 22Recall
Applies the selected slot to the current target camera.
- 23Delete
Removes the selected slot (and clears it from A/B if it was assigned).
- 24Set A
Assigns the selected slot to comparison slot A.
- 25Set B
Assigns the selected slot to comparison slot B.
- 26Flip A/B
Bounces the target camera between the A and B setups so you can judge two framings on the same shot with one click.
- 27A/B Assignment Readout
Shows which slots are bound to A and B, and which one is currently showing after a flip.
- 28Status Readout
Confirms the last write (e.g.
✓ 24.9×18.7mm · 51mm) in green, or an error in red if there's no target camera.
In Maya a “camera” is really just a film-back size plus a focal
length. The tool writes those two values (and the gate flags) straight onto the target
cameraShape inside a single undo chunk, then refreshes the viewport — which is why the gate
updates the instant you move a control.
Millimetres in, inches out
Humans talk in millimetres; Maya stores film back in inches. Every preset is held in mm and divided by 25.4 on write. The attributes touched per change:
horizontalFilmAperture ← W mm / 25.4
verticalFilmAperture ← H mm / 25.4
lensSqueezeRatio ← anamorphic squeeze (1.0 = spherical)
focalLength ← lens (mm)
displayResolution / displayFilmGate / displayGateMask(Opacity) ← gate
🎥 Digital Cinema
ARRI Alexa 35 · LF · 65 · RED V-Raptor 8K VV · RED Komodo 6K · Sony Venice 2 · Blackmagic URSA 12K. The modern VFX workhorses, Super35 through large format.
🎞 Film Stock
Super 35 · 35mm Academy · Anamorphic 35 (1.33× / 1.5× / 1.8× / 2×) · 65mm / IMAX · 16mm. The photochemical looks, with anamorphic squeeze baked into the preset.
📷 Stills / Consumer
Full Frame (36×24) · APS-C · Micro 4/3 · iPhone (main). For previs, virtual production and mograph framing.
Lens Primes
The lens dropdown offers the focal lengths a DP actually reaches for — ultra-wide through super-tele — and the slider covers everything in between:
8 · 12 · 14 · 16 ultra-wide
18 · 21 · 24 · 28 wide
32 · 35 · 40 · 50 standard
65 · 75 · 85 short tele / portrait
100 · 135 · 200 · 300 · 400 · 600 tele / super-tele
A/B Compare Slots
Type a name and press Save current to snapshot the full setup — sensor size, squeeze, focal length and gate settings — into a slot. Select a slot and press Set A or Set B to assign it, then ⇄ FLIP A/B bounces the target camera between the two so you can judge framing on the actual shot. Recall applies the selected slot; Delete removes it. Slots are saved per-user via optionVar (JSON), so reusable “looks” travel from scene to scene.
- 1Launch
Run the script in Maya's Script Editor, then call
run(). The panel opens floating — drag it to a dock edge and it behaves like the Attribute Editor. - 2Pick a target
Leave it on Active viewport to drive whatever you're looking through, or switch to Scene camera and choose one from the dropdown (
↻to rescan). The UI seeds itself from the camera's current values. - 3Choose a body
Pick a sensor from the grouped dropdown — or
Custom…and type the millimetres. For anamorphic, choose an Anamorphic 35 preset so the squeeze is set correctly. - 4Choose a lens
Pick a prime or drag the focal slider. Watch the FOV wedge in the header open and close, and the viewport gate re-frame live.
- 5Show the gate
Enable Resolution and/or Film gate and set the mask opacity so the framing is clearly visible while you work.
- 6Check the edges
Turn on the dotted distortion guide and set an inset (≈90%) to see where lens distortion will be significant — handy before committing to staging or to a post distortion pass.
- 7Compare & commit
Save a couple of looks into slots, assign A and B, and FLIP between them to choose the framing that best suits the shot.
Run It
exec(open('C:/path/to/CameraSensorTool/CameraSensorTool.py').read())
run()