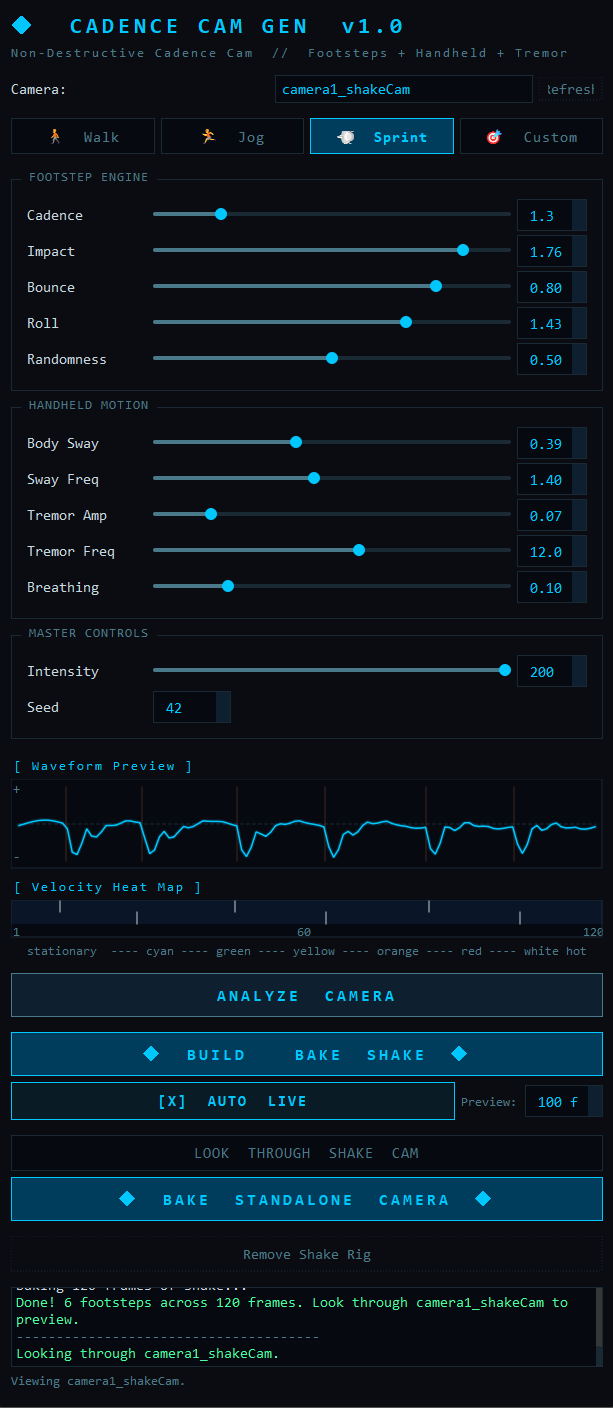
The tool builds a non-destructive camera shake on top of your existing layout animation. Dial in a movement style, preview it live on the built-in oscilloscope and velocity heat-map, then bake it onto a clean group rig that can be removed at any time without damaging your original camera path.
- 1Camera Selector
Dropdown of every camera in the scene (Maya's default
persp/top/front/sidecameras are filtered out). TheRefreshbutton re-scans the scene — handy after importing or renaming a camera. - 2Preset Buttons — Walk / Jog / Sprint / Custom
One click loads a fully tuned movement style across every slider.
Customsimply clears the active highlight so you can hand-build your own feel. Selecting a preset updates the live waveform instantly. - 3Footstep Engine — Cadence
Steps per second. Drives how frequently footfall impacts are generated along the timeline (e.g. 1.8 for a walk, 3.5 for a sprint).
- 4Footstep Engine — Impact
Master strength of each footfall. Scales both the vertical bounce and the rotational roll produced by a step.
- 5Footstep Engine — Bounce
The vertical (translateY) drop the camera takes on each step, modelled as a damped spring so it settles naturally.
- 6Footstep Engine — Roll
Side-to-side rotational rock (rotateZ) added per step. The direction alternates left/right foot for a believable gait.
- 7Footstep Engine — Randomness
Humanises the timing of each step by jittering when it lands, so the cadence never feels metronomic.
- 8Handheld Motion — Body Sway
Amplitude of the slow lateral drift (translateX) that simulates the operator's weight shifting from side to side.
- 9Handheld Motion — Sway Freq
Speed of the body sway in Hz. Lower values read as a relaxed walk; higher values feel hurried.
- 10Handheld Motion — Tremor Amp
Amplitude of the layered high-frequency micro-shake (rotateX/Y/Z) — the subtle hand-held nervousness on top of the larger motion.
- 11Handheld Motion — Tremor Freq
Speed of the tremor in Hz. Three offset sine waves are blended at this base frequency for an organic, non-repeating jitter.
- 12Handheld Motion — Breathing
A very slow rise/fall added to the sway, mimicking the operator's breathing cycle.
- 13Master — Intensity
A single 0–200% multiplier over everything. Perfect for dialling the whole effect up or fading it out without touching individual sliders.
- 14Master — Seed
Randomisation seed. The same seed always produces the identical shake, so results are repeatable; change it to roll a different variation.
- 15Waveform Preview
An oscilloscope of the combined vertical displacement. It redraws live as you move any slider, with faint vertical markers showing where each footstep lands.
- 16Velocity Heat Map
A thermal bar of the camera's real per-frame speed (cool = stationary → white-hot = fast), populated after you press
ANALYZE. White tick marks overlay the generated footstep timing. - 17Analyze Camera
Samples the selected camera's world-space velocity across the playback range and draws the heat-map. Read-only — it never changes your scene. Run this before building to match shake intensity to how fast the camera is actually moving.
- 18Build & Bake Shake
Builds the non-destructive rig under the selected camera and keys the shake across the full playback range. Your original camera is never modified — its animation drives the rig, and a new preview camera (
<cam>_shakeCam) shows the combined result. Wrapped in a single undo chunk. This is step one — build the rig first, then use Auto Live to iterate. - 19Auto Live
On by default. While active, any change to a preset or slider automatically re-bakes the shake onto the existing rig after a short pause — so switching Walk → Jog → Sprint feels immediate. The Preview spinbox (default 100 fr) limits the re-bake to the first N frames so tweaking stays fast on long shots. The button turns amber and shows … BAKING while updating. When you're happy, press BUILD & BAKE to commit the full range, or go straight to BAKE STANDALONE CAMERA.
- 20Look Through Shake Cam
Looks through the rig's preview camera so you can see the shake live in the viewport — the original camera stays exactly where it was. Scrub the timeline to review the Auto Live preview range.
- 21Bake Standalone Camera
Bakes the combined original-motion + shake into a brand-new, independent camera (
<cam>_shakeBaked) with its own keyframes — rig-independent and ready to hand off or export (e.g. via the Solaris exporter). The rig and original are left intact. Uses a constrainedbakeResultspass so every frame evaluates correctly. - 22Remove Shake Rig
Deletes the rig and its hidden helper locator. Because the original camera was never touched, it is already pristine — there is nothing to restore.
The rig is built under the original camera, so the camera's own animation drives the whole chain through Maya's hierarchy — the original node is never baked, reparented, or modified in any way. A new preview camera at the end of the chain shows original motion + shake, and everything updates live as you scrub.
Hierarchy
camera
└ _SHAKE_MASTER — identity; rides the original camera
└ _SHAKE_WORLD — orient-constrained to world identity
└ _SHAKE_TRANS — translation shake (bounce = world‑up, sway)
└ _SHAKE_AIM — orient-constrained back to the camera
└ _SHAKE_ROT — rotation shake (roll + tremor)
└ _shakeCam — preview camera (no keys; lens live-linked)
Reversible & Export-Ready
Remove Shake Rig simply deletes the rig and its hidden world-reference locator — the original camera was never touched, so there is nothing to restore. When you're happy, Bake Standalone Camera samples the preview's combined motion (via a constrained bakeResults pass) into a fresh, independent camera with keyframes — perfect for hand-off or USD/Solaris export. Build, Bake and Remove each run inside a Maya undo chunk.
🚶 Walk
Gentle, slow gait. Cadence 1.8, light impact and bounce, soft sway and a barely-there tremor. The everyday handheld look.
🏃 Jog
Faster and heavier. Cadence 2.8, doubled impact, stronger roll and a more noticeable sway/tremor for an energetic feel.
💨 Sprint
Fast and aggressive. Cadence 3.5, full impact and roll, the widest sway and the most tremor — a hard-running camera.
Custom Mode
Start from any preset, then nudge individual sliders — or click Custom to clear the highlight and build a movement style from scratch. The Seed field keeps every variation repeatable.
- 1Launch
Run the script in Maya's Script Editor:
exec(open('.../CadenceCamGenerator.py').read()). The panel opens docked to the Maya window. - 2Pick a camera
Choose your animated layout camera from the dropdown (hit
Refreshif it isn't listed yet). - 3Analyze (optional)
Press ANALYZE CAMERA to see the camera's real velocity as a heat-map — useful for matching shake intensity to how fast the camera is actually moving.
- 4Choose a style & preview
Click Walk / Jog / Sprint or tune the sliders. The waveform preview updates live so you can feel the motion before committing anything to Maya.
- 5Build & Bake
Press BUILD & BAKE SHAKE. The non-destructive rig is built under your camera and the shake keyed onto it across the full playback range — the original is untouched. Do this once.
- 6Iterate with Auto Live
Auto Live is on by default. Now switch presets or nudge any slider — the tool automatically re-bakes the preview range (default 100 fr) onto the rig after a short pause. The button flashes … BAKING while updating. Switch Walk → Jog → Sprint and feel the difference immediately in the rig without pressing anything.
- 7Preview in viewport
Press LOOK THROUGH SHAKE CAM and scrub the timeline to review the shake live. The rig reflects your latest Auto Live settings.
- 8Commit the full range
When you're happy with the feel, press BUILD & BAKE SHAKE once more to bake the full shot range with your final settings (Auto Live only bakes the preview window).
- 9Bake out
Press BAKE STANDALONE CAMERA to produce an independent, keyframed camera (
<cam>_shakeBaked) for hand-off or export. Or press Remove Shake Rig to clear the rig entirely — your original camera is already pristine.
Run It
exec(open('C:/path/to/CadenceCamGenerator/CadenceCamGenerator.py').read())