Open Gate Crop is a dockable panel that builds a camera around two film-back states — a full Open Gate (the whole sensor / plate) and a cropped Show region inside it — and lets you toggle the camera between them with one click. Because the focal length is held constant, shrinking the film back is a real sensor crop: the field of view narrows and Show becomes a true punch-in of the open-gate plate, exactly like a windowed sensor mode on a cinema camera. The whole state is stored on the camera so the toggle survives save, reload and relaunch.
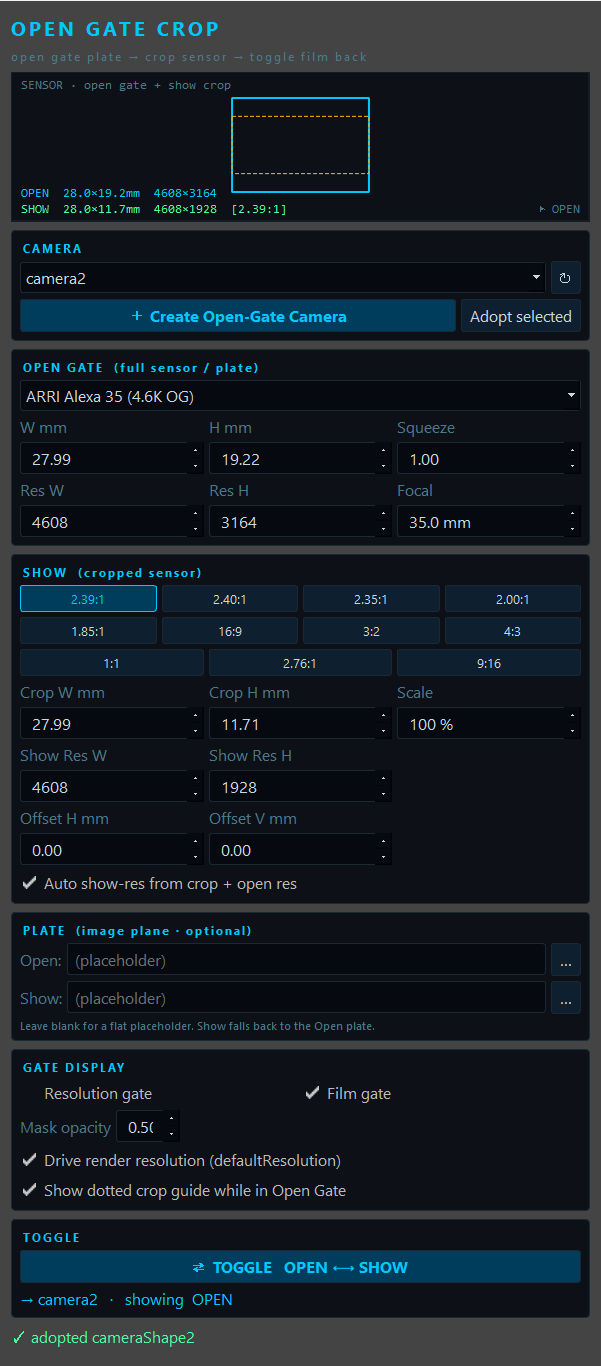
- 1Sensor / Crop Diagram
A live top-down chart of the two film backs: the open gate as the outer rectangle and the show crop inset inside it, positioned by the film offset. The currently-active state is drawn bright (the other dimmed), and the readouts report each state's size in mm and pixels —
OPEN 28.0×19.2mm 4608×3164overSHOW 28.0×11.7mm 4608×1928 [2.39:1]here — with a▶ OPEN/▶ SHOWflag showing which one the camera is on. - 2Camera Dropdown
Lists every Open-Gate camera in the scene — those carrying the tool's state attribute. Selecting one seeds the whole UI from its stored Open / Show setup, so you can re-open the tool later and keep working.
- 3Refresh
Re-scans the scene for tool cameras — handy after opening a file, importing or renaming.
- 4Create Open-Gate Camera
Builds a fresh camera from the current UI values, attaches an open-gate image plane, writes the state, and looks through it in the active viewport. This is the usual starting point.
- 5Adopt Selected
Attaches Open-Gate state to a camera you already have (the selected one) instead of creating a new one — useful for cameras that came in from tracking or a layout publish.
- 6Open-Gate Sensor Preset
Grouped list of real open-gate bodies — ARRI Alexa 35 / LF / 65, RED, Sony Venice 2, Blackmagic, Super 35, 65mm/IMAX, Full Frame, APS-C — plus
Custom…. Each preset fills the width, height, native open-gate resolution and squeeze in one shot. - 7Open Width (mm)
Full sensor width in millimetres →
horizontalFilmAperture(written as inches, mm ÷ 25.4). This is the plate the crop lives inside. - 8Open Height (mm)
Full sensor height →
verticalFilmAperture. Width × height define the open-gate aspect. - 9Squeeze
Anamorphic squeeze ratio →
lensSqueezeRatio.1.0is spherical; the crop inherits the same squeeze and the diagram desqueezes horizontally to match. - 10Open Res W
The camera's native open-gate pixel width. Used as the basis for deriving the cropped Show resolution (see #21).
- 11Open Res H
Native open-gate pixel height. When the camera is on Open Gate and Drive render resolution is on, this is pushed to the scene render settings.
- 12Focal Length
Lens focal length in mm →
focalLength. It is shared by both states and held constant across the toggle — which is exactly why shrinking the film back reads as a sensor crop rather than a zoom. - 13Aspect Presets
One-click delivery aspects —
2.39 · 2.40 · 2.35 · 2.00 · 1.85 · 16:9 · 3:2 · 4:3 · 1:1 · 2.76 · 9:16. Picking one insets the largest centred rectangle of that aspect inside the open gate and fills the crop fields below. Editing the crop by hand clears the chip back to custom. - 14Crop W (mm)
Width of the cropped sensor in millimetres. Set by an aspect chip or typed directly for an exact windowed mode → Show
horizontalFilmAperture. - 15Crop H (mm)
Height of the cropped sensor → Show
verticalFilmAperture. Width ÷ height is the Show aspect. - 16Scale %
An extra punch-in on top of the chosen aspect —
100%uses the largest fit, lower values tighten the crop further inside the open gate for a centre-extract zoom. - 17Show Res W
Cropped delivery pixel width. With Auto on it is derived from the crop and open resolution; otherwise type it.
- 18Show Res H
Cropped delivery pixel height, kept on the crop's exact aspect (rounded to even numbers so codecs are happy).
- 19Offset H (mm)
Slides the crop horizontally within the open gate → Show
horizontalFilmOffset. Leave at0for a centred crop. - 20Offset V (mm)
Slides the crop vertically → Show
verticalFilmOffset— e.g. a positive value for a top-weighted 2.39 extract. - 21Auto show-res
When ticked, the Show resolution is computed from the crop size relative to the open gate (
resW = openResW × cropW / openW), so the cropped delivery always matches the sensor area. Untick to type bespoke pixel dimensions. - 22Open Plate File
Optional image / footage frame for the open-gate plate. Browse with
…. Left blank, the image plane shows a flat placeholder tint so you can still see the sensor area. - 23Show Plate File
Optional separate plate for the Show state (e.g. a graded or re-framed version). If left blank, Show falls back to the Open plate so the crop is a punch-in of the same image.
- 24Resolution Gate
Toggles the resolution gate (
displayResolution) so the active state's render framing is drawn in the viewport. - 25Film Gate
Toggles the film gate (
displayFilmGate) — the physical sensor outline. Either gate switches on the surrounding mask automatically. - 26Mask Opacity
How dark the area outside the gate is drawn (
displayGateMaskOpacity) —0invisible,1solid black surround. - 27Drive Render Resolution
When on, toggling also pushes the active state's pixels to
defaultResolutionso the resolution gate frames the crop exactly. Note this is the global render resolution — turn it off if you'd rather leave render settings untouched. - 28Show Crop Guide
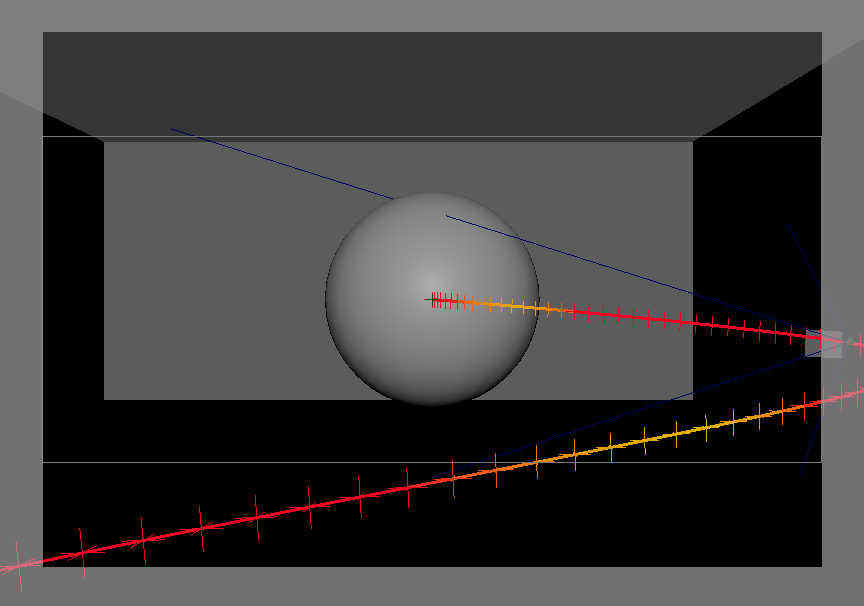
While the camera is on Open Gate, draws a dotted rectangle (a template, unselectable curve parented to the camera) showing exactly where the Show crop will land — a framing preview before you toggle.
- 29Toggle Open / Show
The headline control. Flips the camera's film back, offset and (optionally) render resolution between the Open Gate and Show states in a single undo chunk, and refreshes the viewport. One camera, two looks.
- 30State Readout
Confirms the target camera and which state it is currently showing (e.g.
→ camera2 · showing OPEN), tinted cyan for Open and amber for Show. - 31Status Readout
Confirms the last action (e.g.
✓ adopted cameraShape2) in green, or an error in red.
A camera in Maya is a film-back size plus a focal length. Hold the focal length still and shrink the film back, and the frustum narrows — so the active sensor area gets smaller and the image is cropped tighter. That is exactly what a windowed / cropped sensor mode does on a real camera, and it is the whole trick behind the toggle.
Millimetres in, inches out
Humans talk in millimetres; Maya stores film back in inches. Each state is held in mm and divided by 25.4 on write. Per toggle the tool sets:
horizontalFilmAperture ← (state) W mm / 25.4
verticalFilmAperture ← (state) H mm / 25.4
horizontalFilmOffset ← (Show) offset H / 25.4 (0 on Open)
verticalFilmOffset ← (Show) offset V / 25.4 (0 on Open)
lensSqueezeRatio ← squeeze (shared)
defaultResolution.w/h ← (state) show / open pixels (optional)
🎥 Digital Cinema (Open Gate)
ARRI Alexa 35 4.6K · Alexa LF 4.5K · Alexa 65 6.5K · RED V-Raptor 8K VV · RED Komodo 6K · Sony Venice 2 8.6K · Blackmagic URSA 12K — each with its native open-gate pixel count.
🎞 Film / Stills
Super 35 (4-perf) · 35mm Academy · Anamorphic 35 (2×) · 65mm / IMAX · Full Frame · APS-C. The photochemical and large formats to crop down from.
▣ Custom
Type any width, height and resolution for a bespoke sensor — and dial the crop numerically for an exact windowed or surround mode.
Delivery Aspects
The Show panel offers the aspects a show actually delivers to, as one-click chips — and the slider-free numeric fields cover anything in between:
2.39 · 2.40 · 2.35 · 2.76 scope / anamorphic
2.00 · 1.85 wide / flat
16:9 · 3:2 broadcast / stills
4:3 · 1:1 academy / square
9:16 vertical / social
The Open-Gate Plate
The image plane is sized to the open frustum (fit = To Size, derived from the focal length and open aperture at a fixed depth) and anchored there. That is what makes the toggle convincing: when you switch to Show, the frustum narrows and the plate is cropped into rather than rescaled to fill the new gate. Browse a real plate per state, or leave it blank for a flat placeholder tint that still shows the sensor area.
- 1Launch
Run the script in Maya's Script Editor, then call
run(). The panel opens floating — drag it to a dock edge and it behaves like the Attribute Editor. - 2Set the open gate
Pick an open-gate sensor body (or
Custom…and type the millimetres + native resolution) and dial the focal length. This is the full plate everything crops from. - 3Create the camera
Press Create Open-Gate Camera (or select a tracked / published camera and Adopt selected). An open-gate image plane is attached and the viewport looks through it.
- 4Define the show crop
Click a delivery aspect chip (e.g. 2.39:1), or type exact crop millimetres / show pixels. Add a Scale % punch-in and an Offset if the extract isn't centred.
- 5Load plates & gates
Optionally browse a plate for Open and/or Show, switch on the resolution / film gate, set the mask opacity, and turn on the crop guide to preview the punch-in.
- 6Toggle
Hit ⇄ TOGGLE OPEN ⟷ SHOW to flip the camera between the full sensor and the cropped framing. The state is stored on the camera, so it survives save, reload and relaunch.
Run It
exec(open('C:/path/to/OpenGateCropTool/OpenGateCropTool.py').read())
run()