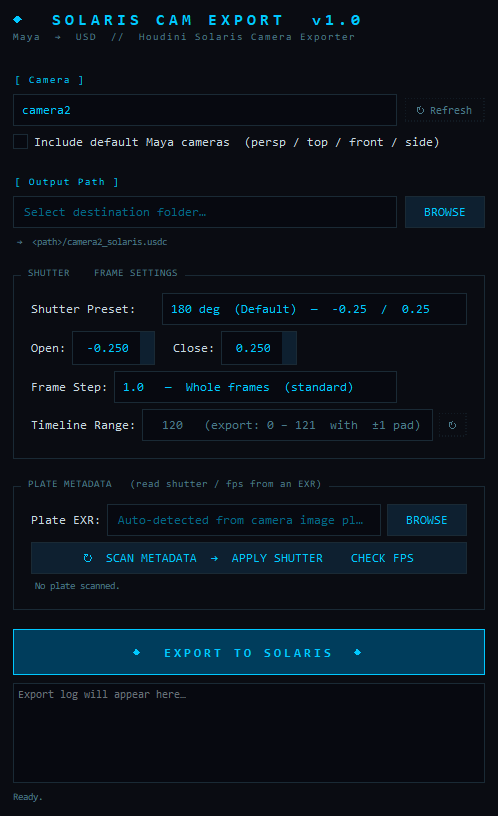
- 1CAMERA SELECTION & REFRESH
A dropdown menu containing all valid cameras in your scene. Use the ↻ Refresh button to update the list if cameras were added or removed while the UI was open.
- 2INCLUDE DEFAULT CAMERAS
By default, standard Maya cameras (
persp,top,front,side) are hidden from the list to keep it clean. Check this box to make them visible and selectable for export. - 3OUTPUT PATH
Define the directory where the
.usdcfile will be saved. Click BROWSE to open a directory picker. A live text preview directly below will show you exactly what the final file path will be. - 4SHUTTER PRESET
Quick selection for common motion blur shutter angles. Choices include 180° (the cinematic standard), 90° (sharp, staccato action), 270° (dreamy, extended blur), or Custom.
- 5SHUTTER OPEN / CLOSE
When the Custom preset is selected, these spinboxes unlock. You can manually define the shutter open and close times as fractions of a frame (e.g., -0.25 to 0.25 represents a 180-degree shutter centered perfectly on the frame).
- 6FRAME STEP
Determines how often a frame is written to the USD file. Use 1.0 for standard whole frames, or drop it down to 0.25 (Subframes) if your camera has extremely fast, curved motion and you need subframe accuracy for rendering motion blur.
- 7TIMELINE RANGE
A read-only display of Maya's current timeline playback range. The exporter automatically adds a ±1 frame pad (e.g., if your timeline is 100-200, it exports 99-201) to ensure Solaris can calculate velocity/slope correctly at the very start and end of the shot.
- 8PLATE EXR & BROWSE
Points the metadata scanner at an EXR plate. This is auto-filled from the selected camera's image plane when one exists, or click BROWSE to choose a file by hand. Leaving it blank simply skips the metadata step.
- 9SCAN METADATA → APPLY SHUTTER & CHECK FPS
Reads the EXR header with a built-in parser (no OpenEXR/OIIO plugins required). If it finds shutter data it sets the Shutter to Custom and fills Open/Close to match the real camera — the math is
angle = expTime × fps × 360, so a 1/48s exposure at 24fps becomes a 180° shutter (±0.25). It also compares the plate'sframesPerSecondto the Maya scene fps and warns on a mismatch. If the EXR carries no usable metadata (e.g. a CG render withexpTime 0), it changes nothing and says so in the log. The fps check also runs automatically every export. - 10EXPORT & PROGRESS LOG
Click the large export button to execute the USD write. The log area directly below will display real-time progress, print the exact output path on success, and highlight any errors encountered.